Monday, August 15, 2011

Win one of five copies of Cake Boss, Season 2 on DVD.


If you’re ever short of cake inspiration, you’ve come to the right place. A moving, flashing robot cake, a seven foot tall solar system and a talking frog cake.. Buddy Valastro and his big, loud Italian family have attempted every type of novelty cake you could think of!
If you happen to be a part of a large Italian family, or even if you’ve watched the movie ‘My Big Fat Greek Wedding’, then you’ll definitely appreciate the hilarious dynamics of Buddy, his four sisters and three brothers-in-law. That’s correct - they ALL work in the bakery. Together. I have no idea how they do it. There is yelling, screaming and sometimes there are tears (and lots of dropped cakes). But they manage to make it work and create some of the most amazing, extravagant cakes I’ve ever seen (I’m talking a wedding cake with a built in bird cage and real live doves. Inside the cake. Seriously). 
What I love most about this DVD is the bonus features, including tutorials on basic to advanced level cake decorating. Who needs an expensive, overpriced two day cake decorating course when you could just watch these tutorials!
And thanks to the wonderful gals at Adele Feletto I’ve got FIVE copies of Cake Boss, Season 2 on DVD to GIVEAWAY! 
We all like free stuff, yeah? Thought so. OK, this is how it works.. 
If you could put any flavour into a cake, what would it be? 

To go into the draw to win one of five DVDs all you need to do is leave a comment on this post telling me your answer to the above question, then send your comment and full name to kaybscakes@yahoo.com (otherwise I wont know how to contact you to tell you that you’ve won this amazing prize!) The most creative, unique, hilarious, entertaining answers will win. HURRAY! 
Personally, I would love a hazelnut cake, soaked in frangelico, with lime buttercream frosting. Ohhh yeah, that’s it baby. Give it to me!!
Competition ends Monday 5th September, 2011 at 10am (AEST). Winners will be notified by email on Tuesday 6th September, 2011 and you can enter as many times as you like! This competition is open to Australian residents only.


Tuesday, June 21, 2011

Biota Dining, Bowral.

Just this weekend the boyfriend, Michael, and I spent a lazy few days in the Southern Highlands. A quick hour and a half drive from Sydney, Bowral is the perfect location for a short getaway, particularly in the Autumn/Winter when the leaves are turning orange and the air is fresh and crisp. Perfect!

A few months ago I picked up a Cudo voucher for the new Gilbraltar Hotel (more on that experience later). Obviously a popular voucher as we had to wait a few months before we could book. This turned out to be a blessing in disguise as it meant we arrived in Bowral post opening of Biota Dining, the new venture from James Viles. I spied a review of Biota on Gastronomous Anonymous just before our long weekend, and thankfully Michael agreed that it was a must visit.

 “Biota is a dining experience supporting both local farmers and growers, focusing on artisan produce incorporating seasonal botanicals in all aspects of its menus and environment.. Our onsite automated glasshouse grows over 40 varietels of seed imported from france, netherlands and local suppliers which gives us a constant seasonal harvest of shoots, cresses and seedlings getting put to into gastronomic practice on a daily basis.” - biotadining.com
 
We book for a Saturday night and upon entering the restaurant we find that we’ve scored the premier table – right in front of the kitchen! We have an amazing view of the servery and can see/hear every movement from within the bowels of the kitchen. Around the opposite side of the building is the lounge. Comfortably decked out and featuring a separate menu of tapas style food. Watching the working of the kitchen all night makes me realise my job is mundane in comparison.

 
The wine list is extensive and features a few local wines. I choose a sauvignon blanc from Centennial Vineyards, which is right next to our hotel, only to discover that they are all out. The waitress recommends another local wine and I am horrified to discover that I’ve just agreed to a chardonnay. It wasn’t too bad and the glass size was overly generous (I hear chardonnay is making a comeback, though?).

We start off with warm bread and smoked butter, followed by an amuse-bouche of apple, tomato and Chamomile. The tomato is overly acidic on its own but is palatable with the apple pure.

For entrée I opt for the banana prawns in cured scallop broth with cucumber, green tea and dill seeds ($19). The severing was huge, with a whopping six large banana prawns on my plate. The prawns were perfectly cooked and the broth was tasty, however I did find it to be a tad salty.

Michael ordered the barbecued calamari, dressed with sugar snap peas and celery ($22). I managed to wrangle a small mouth full from him and again, the calamari was perfectly cooked. I despise rubbery, overcooked calamari!

Moving onto mains, we argued for quite some time as to who would order the lamb rump ($41). I came up winner (or should I say, Michael was generous enough to change his order at the last second). The lamb is cooked medium rare (I wasn’t asked for my preference) and is placed on a creamy bed of olive caramel. What I loved most about this dish was the oat milk rolled in garlic ash and hazelnut. Michael summed this up perfectly when he compared the texture of the oat milk to ‘yogo chocolate yoghurt’. It is creamy and light and not at all what I was expecting – more of a bocchini texture? I try a smear of the oat milk with the lamb and it isn’t bad. But what I find to be even more enticing is crumbling the overly crunchy bacon rind over the milk oat. The creamy texture with the salty, teeth shattering bacon is divine!

Michael has ordered the grouper with oysters and nashi ($38), this is a scary prospect as he wouldn’t normally order fish. But I am assured the fish is flaky and the oysters well cooked.

Letting our food settle, we peruse the dessert menu while taking in the exciting scene unfolding in the kitchen. It seems the apprentice was left in charge of picking salad and herbs from the garden for tonight’s dinners, and he hasn’t picked enough or decent quality produce. After a fantastic spray from James, (Michael is highly amused to hear the ‘f bomb’ dropped a couple of times) we see the apprentice with a big bowl running out the back door into the garden to grab more salad.

It was amazing to see James and his kitchen at full steam. By now (approx 9.30pm) the restaurant is about three quarters full and we overhear whisperings from waiters and the kitchen that there are VIPs dinning in the lounge. Even with all this on his plate, James notices that we are still sitting, staring at our dessert menus and he calls over a waitress to send in our direction and take our order. Did someone say Super Chef?
 
There will be no sharing when it comes to dessert. Michael orders the caramel pear, raw cacao ice cream, warm buckwheat and malt ($16), while I opt for the slightly more exotic silken honey and pumpkin cream, pumpkin seed shortbread, curds and whey, ginger juice sorbet ($15). The pumpkin cream is light and airy, and the shortbread is buttery and melts in the mouth. But my favourite part of the dish is the ginger sorbet. Delightfully fresh, I only wish I had a bigger serve!


We have to roll ourselves out to the car, bellies bursting at the brim thanks to the huge servings we were dished up. Michael isn’t normally one for fine dining, he can’t understand why someone would pay an exuberant amount of money for a tiny portion of food on a oversized plate. Our bill comes to around $160, which we both believe to be unbelievably cheap considering the quality and quantity of food. Even a week later, Michael continues to tell me, over and over, how impressed he was with Biota. This was definitely one of the best dining experiences I’ve ever had. The service, the food, the ambiance - everything was fantastic. I hope to return very soon to try out their lounge menu – the mini wagyu burgers sprawling out of the kitchen looked amazing!

Move over, Eschalot. There is a new player in the Southern Highlands and I’m sure the awards will be flooding in very, very soon.

Biota Dining
Address: Kangaloon Road, Bowral, NSW 2576
Phone: 02 4862 2005
Website: biotadining.com

Thursday, April 21, 2011

Self icing peanut butter cupcakes and the diary of a vegan.

I have a friend. Shock horror, I know. He’s pretty cool. We work together and sometimes drink at hip new Sydney bars together. Recently, he decided to become a vegan for a month - purely for a bet. One alcohol fuelled night my friend bet his mates that he could go vegan for a whole month. Typical males. Now, he is writing a blog about it. You can follow his adventures here. During the last few weeks I have enjoyed taunting my friend, Vinnie, with emails of what I will be consuming for lunch that day, ALWAYS including a large chunk of animal product. It’s just what a good friend does.

Just last week I stumbled upon this recipe. I was fascinated by the concept of ‘self icing’ cupcakes. No mess, no extra fuss and you still get to lick the bowl clean. Umm what’s not to love? Only glitch in the plan – it’s a vegan recipe. I was all pumped up for some peanut butter cupcakes with self icing chocolate sauce but I wasn’t about to go and buy a bunch of flax seeds to quell my foodie desires. Now, don’t get me wrong. As a reformed vegetarian of eight years, I can understand the motives behind veganism. But as a result, I can now also appreciate meat. I am now that girl in the group who could actually pass for a guy with all my beer-drinking and meat lovers-pizza-eating. Oh, how times have changed.

Regardless, I went about my plans to suck down several of these cupcakes but without the ‘vegan theme hanging over my head. I reworked the recipe to feature many glorious animal products including milk and eggs. And now I present it to you. Enjoy.


Self icing peanut butter cupcakes with chocolate icing.

Adapted from My Sweet Vegan (by Hannah Kaminsky) as published on http://wingitvegan.blogspot.com/2011/04/cookbook-love-my-sweet-vegan-with.html
Makes 12 cupcakes.

Peanut Butter Cupcakes:

2/3 cup buttermilk
1/2 cup white sugar
1/2 cup dark brown sugar
2 eggs
1/2 cup smooth peanut butter
1/2 cup vegetable oil
1/2 teaspoon vanilla extract
1 1/2 cups all purpose flour
2 teaspoon bicarb soda
1/2 teaspoon salt

Chocolate Peanut Butter Frosting:
1/2 cup creamy peanut butter
1/4 cup Dutch process cocoa powder
2/3 cup icing sugar
1/4 cup full cream milk


To make the cupcakes:
Preheat oven to 175 degrees C and grease a 12 hole muffin pan.
Using electric mixer combine buttermilk, both sugar, eggs, peanut butter, oil and vanilla into your mixer. In a separate bowl, add the flour, bicarb soda, and salt. Add dry ingredients one spoonful at a time into the wet ingredients. Mix until there are no lumps.


To make the icing:
Using an electric mixer, or a hand whisk, combine all of the ingredients for the icing until smooth.


Assemble the cupcakes and icing:
Divide batter between the prepared muffin holes. Add a spoonful of icing into the top of each cupcake and swirl use a toothpick or squewer to swirl and spread over the entire cupcake. Bake for 20 to 25 minutes.

Be careful if you plan on eating these straight out of the oven.. the icing is like lava and will burn a hole in your head. Perfect warmed up with a side of ice cream!
Dear Vinnie,

At the time of publishing, you still have nine days of vegan life ahead of you. Which means you can’t eat these cupcakes. Suck it, bitch! These bad boys are good and you’re missing out!
BUT, if you’re lucky, then maybe I’ll make a batch to celebrate your return to the meat eating, animal product consuming life.

Love KayBizzle.

Wednesday, March 23, 2011

Masquerade cake: Tutorial

Today we're going to learn how to make a gumpaste mask. But first, a more pressing matter. Check out this wicked apron I got for Christmas..


Tehaha Love it. Ok. Now onto more important things.. lets learn how to make this. 


You will need;
Gumpaste – any chosen colour

Cornflour
Rolling pin
Scissors
Knife
Baking paper
Cling wrap
Led pencil
Plastic Mask
Royal icing
Piping bag plus tips
Sparkles!!! Or any decorations you want to use, like peacock feathers.


First off, design your mask. It’s always a good idea to have a design idea before going in. I always sketch my designs while surrounded by inspiration. But be flexible, sometimes the best laid plans can go awry. I made two masks, because my first design sucked. Seriously. It sucked hard, kids!
You also need to make a template for your mask. I found a few I liked and made a variation of them.

Trace your template onto some baking paper and cut out. Next you will need to cut your template out of gumpaste, so prepare your bench top with a sprinkling of corn flour and roll your gumpaste to approximately 5mm thick. We want it to be thick and sturdy. 
Lay your template over the gumpaste and using a small, sharp knife cut out the mask, leaving the eye holes til last.
You may find that the gumpaste will shift as you are cutting it. No problem, just used your index finger to smooth out and shape the gumpaste so it’s all even. Then proceed to cutting out the eye holes. Now, be patient. Once you put this on the actual mask to dry, you’ll probably have to trim the eyes again to get them even.

Now that you have your mask, you'll want to get that realistic shape. Enter the creepy plastic face mask! So, to stop the gumpaste from sliding off, place a layer or two of cling wrap on the plastic mask. You will also want to raise the plastic mask so the gumpaste mask doesn’t dry with its tips sticking out like a pair of tiny wings. I stuck an upside down bowl under mine, which worked a treat!
Once dry, we start the fun bit.. Decorating! I also took the extra step of trimming my dry mask with a small knife, just to round off the corners and even the whole thing out. You may also want to redo the eye holes.
Assuming that the actual mask won’t be consumed, we’re going to use a bit of led pencil to trace our design on the mask (and honestly, who of us didn’t suck on or chew the living daylights out of some led pencils in primary school? Didn’t hurt me).


Ok so, grab some baking paper and trace the outline of your mask, including the eye hole (don’t use your original template because the shape of the mask will have changed).
Use this to draw your design onto. Once you have finalised it, flip the baking paper over and trace the outline of the design. Then, lay the baking paper over the mask (right side up) and rub over the outline again. This will transfer the led on the back of the baking paper onto your gumpaste. Use this technique to ensure all your design is even and consistent.
Now we have a lovely stencil to pipe over. Fill your piping bag with royal icing, coloured to your choice. I was using very dark green/almost back edible sparkles so I tinted my royal icing black. I also used a round #1 size tip, but use your discretion based on your design. Work in sections so the royal icing doesn’t dry before you sprinkle your decorations on top. If it does dry quickly, just grab a fine paint brush and paint with a little bit of water, then sprinkle your decorations on.

To finish I grabbed some peacock feather which I glued to the back with royal icing. Attach to the cake with more royal icing and voila! One beautiful masquerade birthday cake for a beautiful girl.. Happy Birthday Ashleigh!

Friday, March 18, 2011

Frisky Friday - Punk Rock is not dead

Today I had a sudden realisation. You may recall that my Mac died a few weeks ago and I lost everything (promise this is the last time I will harp on about the bloody mac!). Well, today I realised that I'd lost all my music from years past, music that I firmly believe helped shape me into the person that I am today.

Music has always been a big part of my life. In high school I was a total punk rock kid, listening to Blink 182, New Found Glory, The Starting Line, etc. I'm also a contemporary and classically trained singer/teacher. Fo realz. My brother is a bad ass drummer who also plays guitar, bass, violin and probably many other instruments I am not aware of. And my father taught me everything I know about rock and roll.

I also realised today that no one has ever made me a cake. I've made a bucket load for my friends and families, but have never had a big pretty, fondant covered monstrosity to call my own. Don't get me wrong, I'm not complaining about this fact. If you're going to give someone a cake, I believe it needs to be a work of art and truly represent that person to a T!

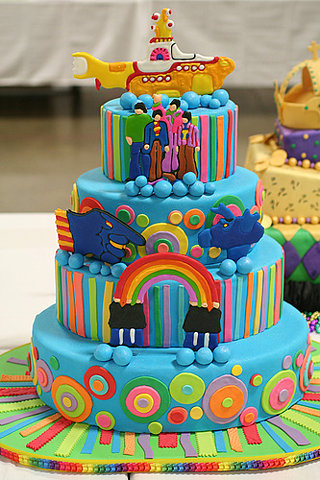
Which again, got me thinking (big effin day for KayB!). If I ever got a special cake, what would it be? What would best represent me? Well, I found it. I WANT THIS BABY!!!

(photo by emptysound on Flickr)

Seriously, I am obsessed with The Beatles. Beyond the music and movies, I have numerous books and artworks devoted to the legendary four. They revolutionised rock and roll for the entire industry, and I don't think I've ever heard any artist say 'nah, I wasn't influenced by The Beatles'. I always have music playing while baking and I promise you, I've made some of my best cakes listening to The Beatles.

So, if you could have any type of cake, what would it be?

Just to get you in the mood, here are the rocking and rolling bips and bops;

This is one bad-ass 6 year old birthday cake.. rock on little dude!
Nothing says old school rock like a jukebox cake. Oh how I'd love a jukebox to call my own!
You can't deny that Gene Simmons' face on a cake is kind sexy.. what, just me? I love KISS!
Seriously, this 5 year old either has some wicked advanced design skills or the coolest parents ever. What kind of child gets a three tier, topsy turvy, punk rock, skull encrusted cake?

Friday, March 11, 2011

Frisky Friday - Kiss me, I'm Irish!

But seriously, show me some lovin'! St Patrick's Day is just around the corner and every year I celebrate at the local Irish pub near my work, eating Guinness Pie with mash and drinking several pints of Guinness. Oh and also avoiding all serious work by devoting myself to making countless origami clovers. Good day! My Mother's ancestors came out from Ireland some many years ago, but if you need any more proof of my Irish blood then check this out..


AHHH IT'S MY LITTLE BRO AND HE HAS RED HAIR! (Oh, hay there JayB! You're on my blog! It's cause you're attractive, like me). 

"Tee Har Tee Har Tee Har, Don't touch me lucky charms!" That's the sound a leprechaun makes, right? Ok. Enough with the red hair/leprechaun racism. 

So, do you celebrate St Pat's Day by eating and drinking yourself stupid? Or do you have another holiday that is all consuming of your energy (and Christmas doesn't count, cause I'm pretty sure it's actually law in most states now to eat heaps of food on Chrissy!). 

You've probably figured out by now that this week's Frisky Friday is going to comprise solely of Irish treats. And you would be correct. Congratulations. Please have this pot of gold as a prize. And by pot of gold I actually mean awesome links to rad food. Enjoy!

Pretty sure we need to make more pies, especially the variety with booze in them. Like this Irish Cream Pie
I HEART WHOOPIE PIES, particularly pretty coloured ones
Again, booze in baked treats. Guinness in cupcakes. I'm sold.
Ahhh more leprechaun jokes. And gold cake balls. Told you there'd be a prize pot full of gold!
The perfect St Pat's Day milkshake. It's also on the healthy side of the spectrum. You're gonna need that after all of the above!
Green Pancakes! But no more artificial colouring cause my head is actually about to explode. These have spinach, instead! Nom nom nom nom.

Happy St Patrick's day, y'all! x 

Monday, March 7, 2011

Masquerade cake and pretty peacock feathers

 I couldn’t wait any longer to show you what I’ve been working on for the last week. Tah-Dah! It’s so puuuuurrrrtttttyyyy!  I was asked to make this cake for a masquerade themed 21st birthday party; however the birthday girl had no idea about it up until cake time. SURPRISE!

I’m really happy with how it turned out. I would have liked the colour to have been a bit more ‘teal’, but there were some serious last minute fondant issues which meant having to start over all again *sigh*. Full tutorial on how to design and make this beauty will be up next week. For now I’m off to RADelaide for work. Catch ya’ll on the flip side!