Tuesday, March 19, 2013

Paleo English Muffins


I miss bread. Not the wonder white, tip top, full of bleach variety you buy at woollies. I mean good bread. Organic sourdough. Irish soda bread. Vegemite and avocado on toast. Bread was such a staple in my diet, every morning for breakfast I had toast purely because it was quick and easy (I’m not a morning person whatsoever). One of my work buddies looooooooves bread. I’m talkin all kinds of bread. Slathered with peanut butter. She’s all up in breads grill, yo (in my head she is also a mad gangsta). I try to make her feel bad by telling her that every time she eats bread, Ryan Gosling cries. His tears taste like bread. Sweet, sweet, tasty bread. It doesn’t work. Cause then I’m thinking of Ryan while she’s eating bread and it makes me twice as sad cause I don’t have either of those things in my life. Meh.

Here’s what I have instead of bread. Let’s face it – it’ll never be bread. Nothing will. But until the day that Ryan Gosling walks through my door, I will eat these paleo English muffins instead.

(Disclaimer: these are actually quite tasty. Don’t let my crazy bread ranting put you off them. Ryan will thank you for it).

Paleo English Muffins (adapted from Carrots N Cake)

Ingredients
1/4 Cup almond meal
1/2 Tbsp melted coconut oil
1 egg
pinch of baking powder

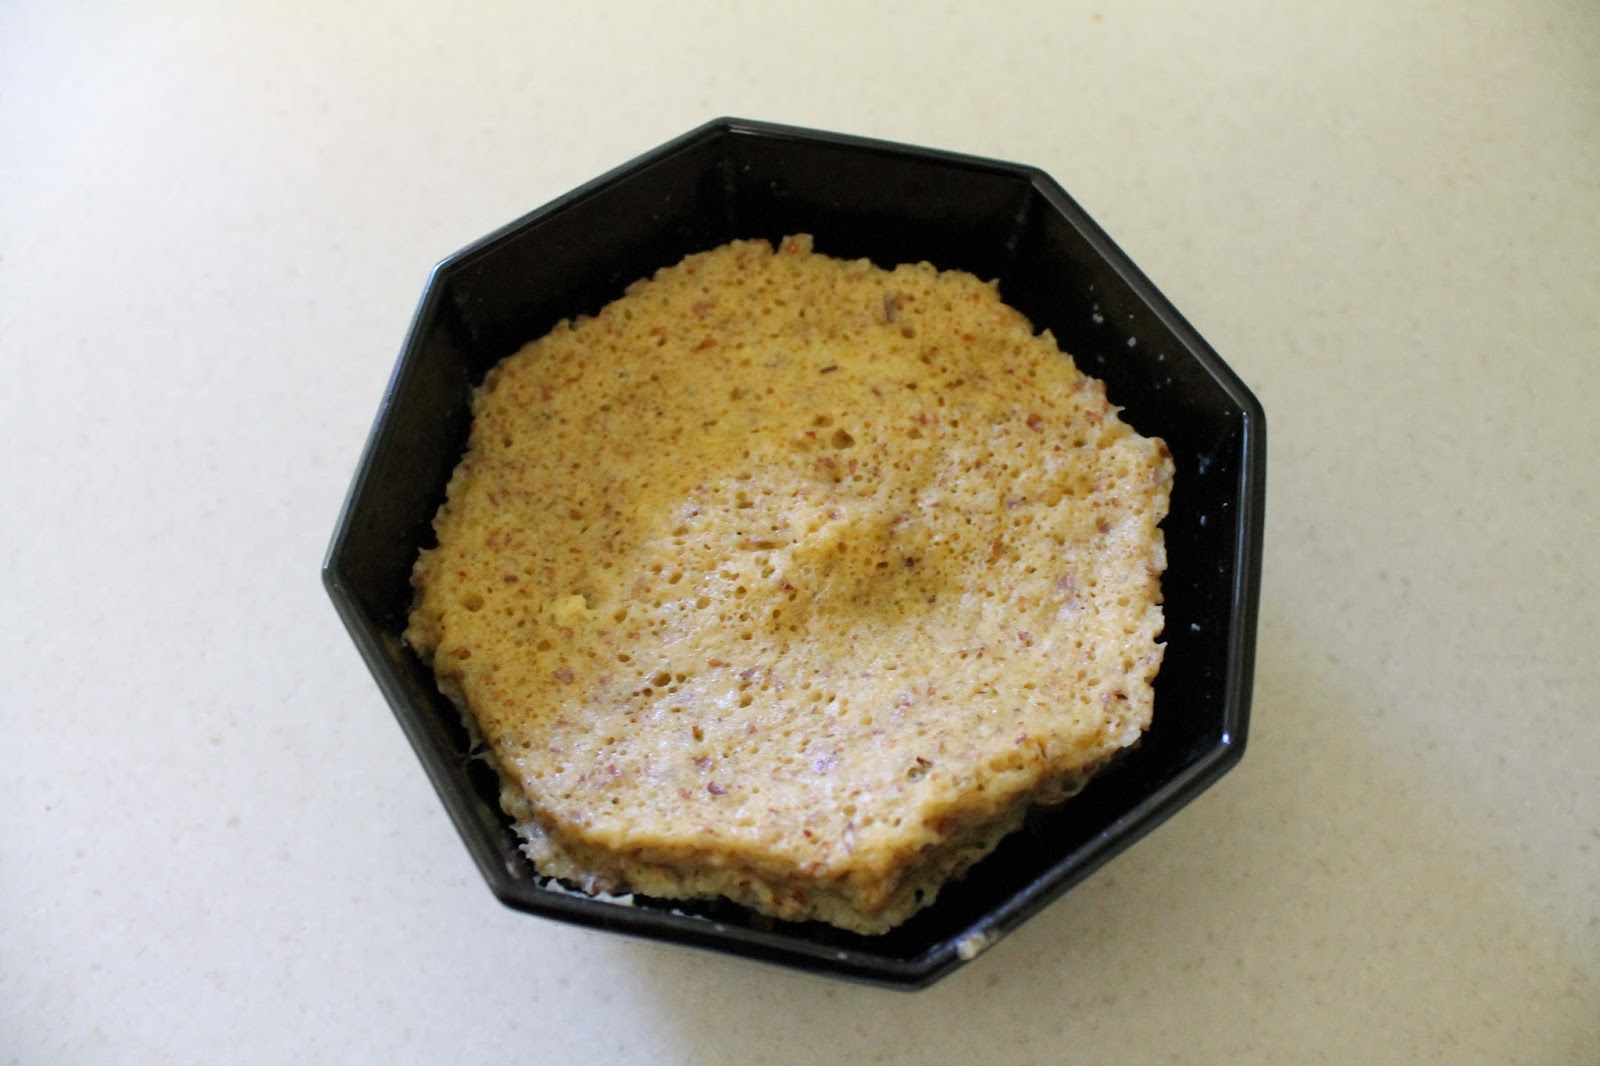
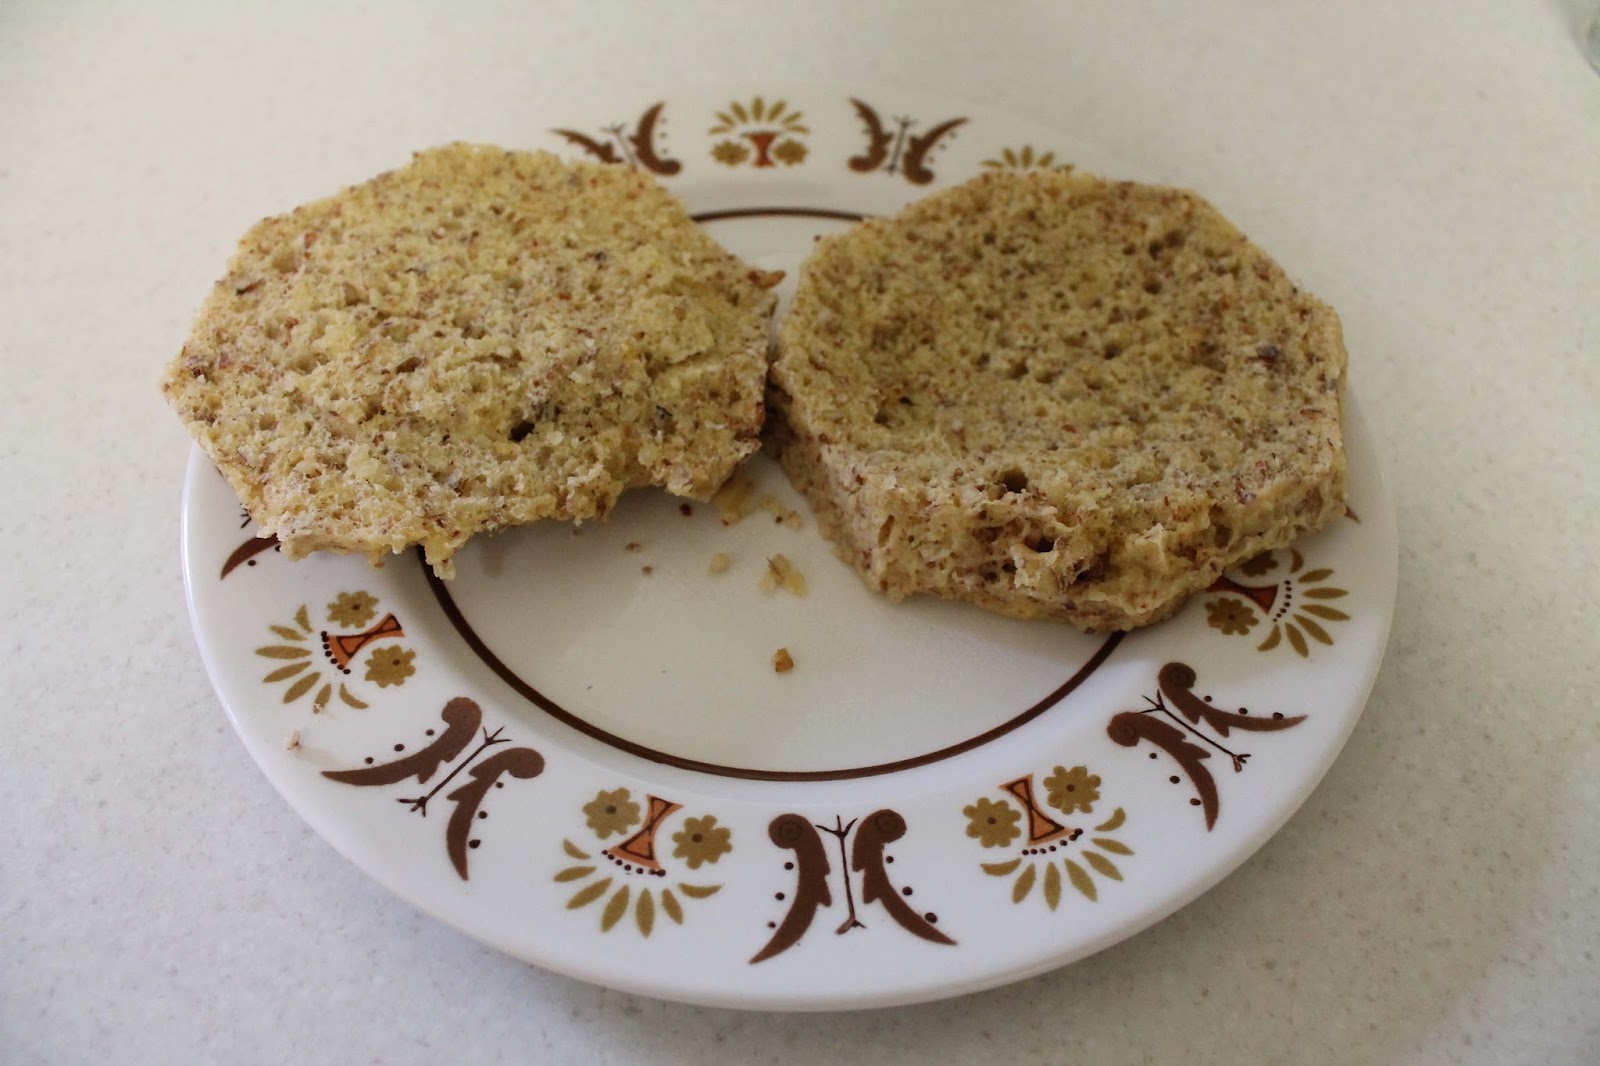
Place all ingredients in a small, microwave proof bowl and whisk well with a fork until all combined. Microwave on high for 90 seconds (note: microwave strength may vary, play around with it until you get it right). Remove from bowl and allow to cool to the touch before cutting in half.

These toast up under the really well, but are also great fresh from the microwave!


Wednesday, March 13, 2013

A Guide to Meal Plans


I hate wasting food. It's my biggest pet hate. It's such a waste. I'd much rather make lots of little visits to the supermarket to make sure I use everything in the fridge, than do one big shop and have to throw out spoiled food. 


Let's talk about meal plans. Sounds boring right? I know. And it is boring to some. But it's actually one of my fav things to do. I get excited when I discover new recipes to try out and include in my plan. Meal plans help me stay on track with my eating, plus I can make an ingredients/shopping list which means I only buy what I need and nothing goes to waste. AND you save money. It's a win win. Duh. Hurray!! 

I do my fruit and veggie shopping on Wednesday at the local produce markets near my work, so my meal plan starts mid week. I'm obvs also reeeeeeeally boring when it comes to 
breakfast. I'm not a morning person. I'd rather sleep than eat.

I don't always stick to my plan, sometimes I feel like chicken when my plan tells me I'm supposed to have lamb, but I will always have a bunch of ingredients for meals in the fridge ready to go. So I can chop and change depending on what I want. I also do my best to include any meals where I will be eating out so I don't over shop. 

Here's a snap shot into a week in my belly. Enjoy! 

Day
Breakfast
Lunch
Dinner
Wednesday
 Egg and Bacon muffin
Leftover chicken
Pesto Burgers
Thursday
  Egg and Bacon muffin
Leftover pesto burgers
Eating out 
Friday
 Granola, almond milk and fruit
Frozen soup
Pizza
Saturday
 Bacon, Eggs and avocado
 Wing it
Eating out
Sunday
 Eating out
 Wing it
Frittata
Monday
  Granola, almond milk and fruit
Left over frittata
Baked chicken & sweet potato
Tuesday
   Egg and Bacon muffin
Leftover chicken salad
Lamb & stuffed zucchini
Wednesday
   Egg and Bacon muffin
Pumpkin & carrot soup
Pesto Burgers?

Shopping List
Basil, raw cashews, iceberg lettuce, mixed lettuce, baby spinach, tomatoes, avocado, sweet potato, lemons/limes, cauliflower, capsicum, zucchini, Olive oil, bacon, steak, salami, cheese, pizza bases, mince x 2, chicken, lamb, eggs, almonds. 


Friday, March 1, 2013

Paleo banana and coconut cookies


Bye Summer! I'm sick of this crappy weather already and it's only been 18 hours! Here's hoping we might have a few more balmy Autumn days ahead of us. If not, just make a batch of these and eat them all. Guilt free. They'll totally take you mind off the crappy Sydney weather. Eat with a big glass o' ice cold chocolate almond milk. Errrrmahgawd. 

Ingredients
2 brown medium sized bananas
1/2 cup almond meal
1/2 coconut flour
2 eggs
Tsp cinnamon
Tsp nutmeg
Tsp ground ginger
Tsp baking powder
Unsweetened shredded coconut

Pre heat oven to 200 degrees fan forced. Place all your ingredients, excluding the shredded coconut in a food processor and blend. Or if you're not lazy like me, place in a bowl and mix the old fashioned way until well combined.

Take heaped teaspoons of the mixture and roll into balls, roll in the shredded coconut, then place on trays lined with baking paper and flatten.

Baking for 20 minutes or until golden brown around the edges.

Makes approx 18-20 cookies.


Thursday, February 21, 2013

Paleo Chicken Nuggets


You know those days where you just want to come home, sit in front of the TV and eat comfort food? Nuggets are my comfort food. They remind me of being a kid, having play dates with my primary school friends during the school holidays and mum letting us eat nuggets and oven-bake chips.

I've never been the type of person who can just give up particular foods because they're 'bad', so when I made the switch to a paleo lifestyle I was determined not to give up the comfort foods that I love, but make paleo variations instead. When I made these nuggets for the first time I was sure they were better than regular nuggets. Perhaps my many months as a caveman had brainwashed me, or I had just forgotten what processed food tastes like?! But last night, after a particularly full on week at work resulting in a desperate need for comfort food, I made them again and my boyfriend declared 'These are seriously good. Like, the best nuggets ever'. I'm pretty sure I could serve these to people and they wouldn't even realise they were paleo!

Paleo Chicken Nuggets (serves 4)

Ingredients
4 chicken thighs (or breast meat)
1 cup almond meal
2 tablespoons mixed Italian herbs (basil, oregano, thyme, parsley, etc etc..)
Salt & pepper
1 egg, lightly whisked
Olive oil

1. Remove fat from chicken and dice into nugget size pieces
2. On a large, flat plate combine your dry ingredients (almond meal, herbs, salt & pepper)
3. Dip your chicken pieces into egg, then coat with the almond mix until well covered. Lay out chicken nuggets on a plate covered with baking paper and pop in the fridge for 1/2 hour before baking.
4. While chicken is in the fridge, cover your baking tray with enough oil to grease the entire tray. Pop the tray in the oven and pre heat to 200 degrees fan forced.
5. Pop your nuggets on the pre heated tray (this helps the almond coating from sticking) and baking for 30 minutes (turing once) or until golden brown on both sides.


Thursday, January 31, 2013

Paleo Banana Ice Cream


I'm a sucker for ice cream. When I was in New York last year I pretty much ate the entire city clean of Ben and Jerry's. It wasn't pretty. I'm not sure where I stumbled upon this fake ice cream trick, but I know it's not only the paleo community who enjoy it, mothers are also suckers for this sugar free, kid friendly treat. It is super quick and super easy! I'm planning to experiment with adding some more flavours to the mix, but for the meantime my boyfriend and I enjoy a bowl with strawberries and a little bit of nutella.

Ingredients.
1 ripe banana

Chop your banana up into bit size pieces and lay on a plate covered with baking paper. Whack in the freezer for an hour.

Grab your food processor and throw your frozen banana chunks in. Whiz on low until all the banana is whipped up and creamy. You'll probably need to scrap down the sides as your go, but shouldn't take more than a few minutes.

If you don't have a food processor or blender, you can pre mash the bananas before you freeze them, the texture will be a little less creamy, though.

Wednesday, January 30, 2013

The revival of KayBs Cakes.

Hey friends! Hope you all had a wicked christmas and new years. 

As you can see, there has been a significant drop in my blogging of late. Sorry dudes. But I’m back to sweep away the cobwebs and fire this baby back up. I thought I’d kick off the revival with an explanation for my absence. I’ve debated over whether or not to publish this post for a little while now, and if you feel like clicking away and checking your facebook or twitter instead of reading on, I will not be offended whatsoever. 

The main reason why I haven't been blogging is that I’ve recently converted to a paleo way  of life. Basically, I’ve been living like a caveman. If you haven't heard of Paleo before, in a nutshell, Paleo eating involves nothing processed; no grains, no wheat, no legumes, no dairy, no processed fats. It involves eating only whole foods; fresh organic veggies, fruit, meat, nuts, seeds and natural fats like coconut and pure olive oil. As a result, sugar, flour and all those wonderful things that go into cakes and cookies have been banned from my home. Hence the lack of KayB’s Cakes.

It’s a big change and there have been many factors behind this decision, but the main push came when I was diagnosed with a condition called Hidradenitis Suppurativa, also known as HS disease. HS is a chronic condition that attacks the sweat glands and surrounding skin causing tracks, pussy lumps, bumps and scaring. It’s painful, gross and extremely uncomfortable. Thankfully, my condition is confined to my right arm only. Unfortunately, it is at stage 3, for which I recently underwent surgery which was supposed to put me into remission but hasn't worked as planned. 

Very little is known about HS disease as it only affects a very small portion of the population, mostly female. I’ve been sent to various doctors and specialists over the last 3 months, while also relying on my own research to try and find a suitable way to slow the disease and gain some relief. The next few months will be a combination of medication, tests, scans and new doctors. Some studies indicate that HS is an autoimmune disease and I’ve found some great resources that indicate diet has a large impact on flare ups. Enter the paleo meals. 

So there you have it. As you can imagine, I really haven't been motivate or energetic enough to tackle any big cake projects recently. But I’ve been feeling really great lately, and even though I do have slip ups (oh, chocolate and booze - hey, I’m only human!) I know the paleo life is working and I intend to make this a lifestyle change for the good. I’m really keen to keep this blog up to date and feature plenty of paleo friendly recipes. I’m still baking every other week (recently perfected my paleo banana muffin recipe!) and cant wait to share all my healthy tips and tricks with you all. And don't worry, the big, sugary, cream covered cakes and tutorials will make a return.. but I wont be the one eating them! 

Thanks for reading, kids. If you want to email me to ask about paleo or HS, please please please feel free. Big love.

KayBxx

Sunday, November 11, 2012

Ombre Wedding Cake Tutorial


I had the exhilarating task of making my SECOND wedding cake this year for my dear friends, Darcy and Elyse. The Bride sent me some inspirational photos of soft iced cakes and a colouring concept that I wasn't familiar with - ombre. While the faded colour of this cake may look challenging to achieve, it was actually really easy to pull off. Just make sure you do some bicep exercises leading up to the task because all that icing killed my arm!

Soft Iced Ombre Buttercream Wedding Cake - How to.

What you'll need.
2 x batches of butter cream icing (divided into 5 batches)
Bowls
Large flat blade cake spatular
Gel colouring in your chosen colour


Start by filling and stacking your cakes, then cover in a thin crumb coat. Use uncoloured butter cream for this. Pop in the fridge to set.


While your cakes are in the fridge, start colouring your icing. I used four colours for my cake, fading from an off-white on the top down to a bright pink on the bottom. The best way to achieve the faded colour range is to work from the top/lightest colour down. You can always make you're icing darker, but it's harder to fix/lighten the icing once coloured. Don't start colouring the next batch of icing until you've managed to get the colour before it right. Try not to make the shades of icing too far apart, as they will blend and mix into each other once you put them on the cake. Also, don't forget that you will need more icing for the darker/base colours as there is more surface area to cover!


I'm trying to achieve a soft and textured look, so I don't have to worry about evenly icing the cake. Start by applying a thick layer of icing in your darkest colour to the bottom half of your base cake, I used a small butter knife to do this. Repeat with the second colour. 


Once the cake is covered in both colours, start to even out the icing with your large flat blade spatular. You will notice that once you start to smooth and even out the icing, the two colours will blend together slightly which makes the colours look as though they're fading into each other.


To achieve the rustic, soft iced look, I take my large flat blade spatular and hold it at a slight angle so the tip of it cuts into my icing as I spin my cake turntable.

I'm really happy with how this cake turned out - and so were the Bride and Groom, which is the most important part! It can be a little bit fiddly, but the overall look is so romantic and rustic. Well worth the effort!


And because it was by far the most beautiful wedding I've ever had the pleasure of attending, there is a lil' video I put together (all shot on my iPhone, hence the crappy quality!) But you get the idea - this video DOES NOT do the wedding justice, it was absolutely stunning!

Congratulations, Darcy and Elyse!! xxx


Darcy & Elyse's Wedding from Kimberley Burrell on Vimeo.